|
Let's Hold Hands!
Create an image that looks like YOU! Create a small ambassador of friendship that will hold hands with another child's self-portrait, another child's small ambassador of friendship.
Make this self-portrait with your own hands. Be creative in your choice of materials, using ones that are readily available, that cost nothing, that are recycled from some other purpose, that now will have additional purpose.
These hand-made collages will be symbols for the good will of today's children as they work towards being tomorrow's peaceful, accepting, respectful, adult friends.
Put out your hand to find a new friend. Hold hands across the street, across the city, state or country. Hold hands across the ocean.
We can help your self-portrait collage to become an ambassador of friendship through the website, an art exhibition, or even as part of a hand-delivered package to a new friend as faraway as Pakistan, Eritrea, North Carolina or Australia.
Let's be friends! LET'S HOLD HANDS!
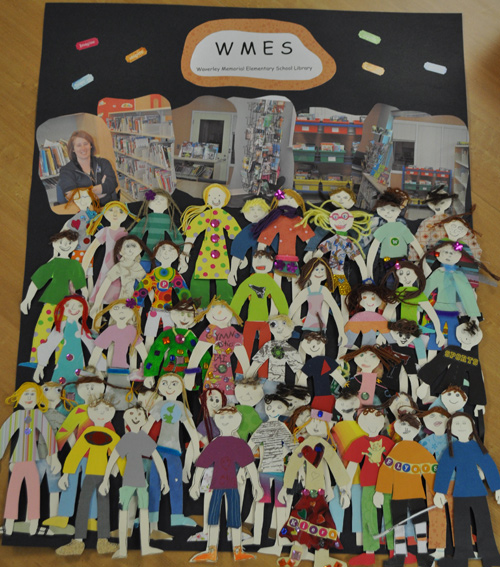
Grade 3 Johnson and Grade 3/2 Rigby from Waverley Memorial Elementary School,
Nova Scotia, Canada
CREATE YOURSELF IN PAPER!
Using simple, recycled materials, following the easy directions below, create a paper doll image of yourself.
MATERIALS:
- one adult to help you
- one heavy weight piece of paper, 3.5” x 8” (9cm x 20cm)
- scissors
- paste and/or double-sided tape
- small scraps of papers and/or fabrics
- computer print-out of the figure
1- PRINT PATTERN
Click here to print the pattern
 
2- PLACE PAPER
Place the heavy paper under the pattern.
3- CUT OUT FIGURE AND PATTERN
Cut through the pattern as you cut out the figure shape from the heavier paper, both at the same time. The figure shape made from the heavier paper will be YOU. Put the pattern aside to use on another doll later, or discard.
4- CHOOSE PAPERS OR FABRICS
Choose paper or fabrics for creating the doll’s clothes. Since this doll is supposed to look like YOU, you may wish to choose colors and styles for clothes like those that you might wear. Do not cut up your own clothes!
5- PLACE DOLL ON TOP
- Place doll on top with paper or fabric underneath.
- Keep the back side of the paper or fabric facing the front side of the doll.
- Trace around the doll with a marker so that the back side of your paper or fabric has the ink tracing of the doll shape.
- You may do this in segments. For example, if you want a red shirt and green pants you may trace and cut the clothing separately.
6- CUT OUT
Cut out the clothing pieces.
7- PASTE OR TAPE
Paste or tape clothing onto the doll.
8- TRIM
Trim clothing to fit.
9- HAIR
- Select the paper or fabric
-
Proceed as you did with making the clothing.
-
Be sure to leave space for your face.
10- EYES, NOSE AND MOUTH
Cut out or draw on your eyes, nose and mouth. If you wish, add your eyebrows and your ears, too. Are you smiling? I hope so!
11- JEWELRY AND ACCESSORIES
Jewelry and accessories may be added now if you wish. You might want to be wearing a necklace or a bracelet, or a scarf or a tie. You could even put a flower in your hair or a hat on your head.
12- HOW TO EXHIBIT
If you would like your doll to hold hands with others on the Let's Hold Hands! website, click here.
Our dolls come from near and far away places all over the world including Pakistan, Egypt, Ghana, Bolivia, Russia, Dominican Republic, Italy, Kenya, Japan, Australia, and maybe even from your next door neighbor.
|